Bishop Haglund,
Thank you so much for sharing your ward with us at the NBIA conference. It was very generous of you and the families in your ward to give their time. It was very kind.
This last week I met many new families who were recently diagnosed. I was reminded about how big of an impact this conference can have. We count finding the NBIA Disorders Association as one of our great miracles.
It took us a long time to figure out what was wrong with our girl. We knew something was wrong by the time Josie was 14 months old. We prayed a lot. We asked all the specialists we could find, and they couldn't tell us much, just that it was affecting her nerves and her muscles.
Finally, after six years without a solid diagnosis we enrolled in the Undiagnosed Diseases Program at NIH. They brought us out to their children's hospital in Bethesda, Maryland. They ran test after test on Josie for a week.
Then they sent us home.
Four months later they brought us in to talk. The doctors had very little information. They could only tell us in very broad strokes about this disease. They had:
* A name: Infantile Neuroaxonal Distrophy
* A cause: A typographical error on both copies of her PLA2G6 genes
* A list of symptoms: Nerve damage, iron accumulation in the brain, dystonia, slurred speech, seizures, etc.
They couldn't provide much consolation, but what they did provide was a link to the NBIA Disorders Association and the upcoming family conference in Austin, Texas.
I cannot over emphasize the importance of that first conference for me and my family. It was an answer to our prayers. We went to the conference filled with some deep despair. We were immediately welcomed by people who had been through the same things. They had suffered same confusion, the same grief, and followed similar journeys to diagnosis.
We met doctors and researchers who were developing a map of these diseases. They are some of the most remarkable people I've ever met. They care deeply for these patients. We learned a lot of helpful and hopeful information about about this disorder.
We found hope in the shining examples of families who soldier on. Families who dealt with incredible loss and disappointment and shared their deepest sorrows greatest successes with us. We found hope in the research, the improved understanding, and the potential to find treatments and a cure.
That conference, like the conference this year, was also made possible by many volunteers who organized, made presentations, put together a picnic, and provided childcare.
Thank you so much for your help this year. You made a life changing impact on families that really needed it.
I know that you and your ward truly fulfilled your covenants, "being willing to bear on another's burdens, that they may be light; yea and are willing to mourn with those that mourn; yea, and comfort those that stand in need of comfort."
Thanks again,
Matt Ritzman
Friday, June 9, 2017

NBIA Board Intro

Ten years ago I would have described myself by what I do for a living.
I work with databases, helping large company manage their physical assets.
Today, my "Work" feels much more like a hobby. Sure, I spend a lot of time there, but even when I am at "Work" I am thinking about Josie, my family and PLAN, Josie's disorder.
Something that I didn't realize when we first noticed Josie's clumsiness was how big a part this would play in our lives. It started off so small, it was just some missed milestones and developmental delays.
Now at times, the basic things that we need to do seem ovewhelming. Just the effort of our daily routine can seem like a lot. Then there's the advocacy for medical and school interventions, additionally, the (thankfully) very infrequent Urgent Care visits
In our PLAN break-out session, earlier today, Pam pointed out that with every accomodation and intervention, you start out overwhelmed, but then get used to your "New Normal," and things you couldn't comprehend previously become run of the mill.
But there's also so much more that I want to accomplish. Unfortunately I don't have the time and expertise to pursue the advocacy and fundraising that our disease really needs.
This brings me to why I'm here. The NBIA Disorders Association helped my family by connecting us to useful information, other families, and researchers. I cannot over emphasize how important that has been.
I jumped at the chance to be on the Board of Trustees, when the opportunity came up, because this organization has done so much for us.
Being on the Board allows me to give back in ways that match my own abilities. Just yesterday, in the board meeting, we discussed a report that Colleen had put together. It had taken her a lot of time and effort because the information came from four different databases that were completely independent. And wouldn't it be nice if she could do that more easily.
Well it turns out that my expertise in working with databases may help with this particular problem.
This is just one instance of many times when I've been able to help or I've seen somebody else use their unique skills to help out the Board. The Board is full of incredible people.
When we share our own unique skills and abilities we are truly stronger together.
Thursday, December 8, 2016
Road Conditions
I know the fingerprint of the streets that I frequently ride. I know where most of the potholes are and how to avoid them.

It hasn't always been that way. When I started commuting, I was startled by many of the bumps in the road. Now I anticipate the problems. I can avoid a the bumps and dips, and I can slow down or cushion the force for obstacles that I can’t be completely avoided.
In most areas, the shoulder is a total mess. There’s debris near the edge; rocks and gravel, glass and litter. Also, the worst potholes occur on the side of the road. It is a dangerous place to be on a bike. Swerving around this flotsam can send you into traffic. It is just better to travel in traffic, and act like a car.
The potholes and debris are an unintended consequence of the design of roads. Most roads have a high center crown that runs the length of the road. This is to make the water drain quickly from the road for the safety of the traffic. Once the water is to the side of the road, there is often a storm drain to transport the water away from the area.
The slope and moving water have several effects:
- Debris on the road tends to move toward the sides.
- Water that doesn’t quickly drain away stays on the side of the road.
- Water that pools in one location will cause the road to deteriorate and cracks and potholes to form.
- The storm drains are, themselves, hazards to cyclists.
If the shoulder is very wide, traffic is moving fast, and there aren’t cars parked in it, it can make a lot of sense to ride in the shoulder.
Wednesday, November 30, 2016
Let's fire this thing up and see if it still works
I've decided that I will be more serious about cycling.
Although cycling has played a huge part in my life, I've kinda down-played its importance. I've never felt like a REAL cyclist. I'm not particularly fast. I don't really care for the Tour de France. I've never ridden in a race. Organized rides are fine, but I'd much rather be out on my own. I don't own a lot of spandex, and I definitely don't look good in it when I do wear it.
But I've got some serious street cred for cycling:
Although cycling has played a huge part in my life, I've kinda down-played its importance. I've never felt like a REAL cyclist. I'm not particularly fast. I don't really care for the Tour de France. I've never ridden in a race. Organized rides are fine, but I'd much rather be out on my own. I don't own a lot of spandex, and I definitely don't look good in it when I do wear it.
But I've got some serious street cred for cycling:
- I've been biking since I was five or six.
- I've used a bike as my main method of getting to and from work ever since I had a paper route at 12 years old.
- Cycling was a key aspect of courting my wife. We wouldn't have gotten together if it wasn't for our bike rides.
- A significant portion of our vacations have been biking tours.
- I biked from New York to Utah on my honeymoon.
Now that I've realized my True Identity, how will I use my powers for good?
Sunday, June 13, 2010
Timeline of Josie's condition for the new neurologist
We're taking Josie to see a new neurologist tomorrow. Last year we realized that we need to keep track of her abilities so that we can share that information with new doctors, therapists, caseworkers, and anybody else who asks. So here it is. Looking back it is a bit depressing, but the good news is, her condition hasn't gotten much worse over the last year.
Josie's development up to about 1 year seemed fairly normal or at least unremarkable. We could be a little off on the ages cited below but overall development seemed to be within the normal range her first year.
4 months or younger - amazing head control, would often lift head up from car seat as if sitting up.
5 months - rolling, scooting
6 months - sitting up
10 months - crawling on knees and hands. Josie was a good crawler
12 months - we noticed that she wasn't developing her speech and motor skills as a typical one year old would.
12 to 14 months - began pulling up to standing position but not as much as our older daughter. Don't have clear memory of when sleeping became a problem but it was around this time possibly before. Josie would wake up many times during the night and did not sleep for long stretches.
18 months -
· Several indicators that something was wrong. Shad not yet begun to walk. Her pediatrician ruled out metabolic problems and bone structure problems and referred me to a P.T., Debbie Patrizi. The PT referred me to pediatric neurologist and a pediatric orthopedist. The Ped orthopedist, Dr. Lincoln, said that whatever was causing her not to walk had nothing to do with her bones.
· Summer 2006 - first visit to pediatric neurologist, Dr. Griffen. Dr. Griffen ordered several blood tests; none of which provided a diagnosis or direction.
2years 2 months - Early 2007 - Josie finally begins to walk independently but with difficulty.
2 years 3 months - Feb. 2007 Muscle and nerve conduction test in Fremont. Results showed that Josie's muscles were fine. Strongly suggested a nerve problem.
2 .5 years -
· Around April or May 2007 - Josie had an MRI, everything looked fine. Josie was walking at this appointment. Dr. Griffen moved to S.F. so we started working with Dr. Malhotra.
· Josie was a W sitter. Josie would crawl and put herself in W position or change out of it on her own.
· May 30, 2007 - Josie started Anat Baniel Method (ABM)
· Early June 2007 Josie abruptly stopped walking after 8 sessions of ABM. Josie was still mobile at this time with crawling and some climbing.
· July or Aug 2007. Josie started using a walker. She was very good at using the walker to get around.
· Aug. 27, 2007. Josie fell over in the driveway in her walker. She broke her elbow. This was the beginning of a huge setback.
· Sept 07. While Josie was in full arm cast, we did more ABM with different practitioner. The cast severely limited her ability to move although she did do some crawling with cast. Very little if any walker use and from her fractured elbow on she never effectively used the walker again.
Almost 3 years to 3.5-
· October 8, 2007 Josie had a biopsy of her muscles and nerves. Biopsy showed axonal degeneration with some reinnervation. Biopsy also showed that muscles were fine.
· Continued gradual loss of abilities and mobility over the next several months. Even unable to sit up for a while but we pretty much got that back through therapy efforts with Lynn at Concord CCS. Somewhere during this time Josie got her first pair of AFOs.
· Early 2008 Becoming very hard to transport (lift) Josie. She weighed about 50 pounds. She was transported with a CCS loaner wheelchair at pre school. At some point they lent us the wheelchair for bus transport. In March 2008 we got a loaner wheelchair from National Seating and Mobility - at first it was a terrible fit but later adjusted and it and it worked fairly well for bus transport.
· June 2008 we purchased a Quickie wheelchair. She loves her wheelchair but she began slipping out of both the old and new wheelchair. This continues to be a problem.
3.5 to 4 years -
· August 2008 We moved to Oakland. Josie's grandpa did intensive exercise regimen with Josie over the course of this year.
· Somewhere in this time period Josie starting to lose the ability to crawl on hands and knees and overall strength.
· Nov. 2008 Josie was casted for new AFO's in an attempt to stop Josie from "slipping or slithering" our of her old ones.
4 to 4.5 years
· Dec. 2008 Finally started PT and OT with Oakland CCS one hour per week. Josie had received NO services since summer. By this time Josie's heel chords were very stiff and her plantar flexion was very limited. Feet deformed looking. No ability to stand. Rolling over gone by now too. Crawling on all fours doable thanks her grandpa but very very labored.
· Dec. 23, 2008 - through efforts of CCS PT got Josie in a loaner mobile stander. It made an incredible difference. A combination of AFOs and the stander greatly improved her plantar flexion in her heels. In fact, the AFOs needed to be remade with a sharper angle. We also borrowed weight bearing walkers, but Josie never learned to use them well.
· April 2009 Met with Malholtra. Autoimmune disease possibility raised. Malholtra said he hasn't helped us much. Upon our request for other opinions, he suggested we go to St. Louis to meet with Dr. Connolly, a doctor he worked with previously.
4.5 to 5 years
· Approx. May 2009. Josie got her own mobile stander to replace the loaner, which was getting small. Right around this same time she got a pressure sore. Without the use of her AFOs, she lost her ability to plantar flex.
· June 15, 2009 Josie became very constipated (didn't have BM for over a week). From then on she has seemed a lot less regular despite our efforts (lots of water, fiber, supplements, etc) to get her back on track. She currently has a bowel movement 4 to 5 times per week - the feces is very hard.
· June 20, 2009 I started giving her some SunRider foods. Sometime soon after sleep improved.
· Summary of Josie's abilities as of July 2009.
Able to roll tummy to back, still needs a little assistance back to tummy. Able to rock side to side on back and does it often. Able to deliberately lift legs one to two inches while sitting in the potty chair. Able to wheel wheelchair and stander around house with skill and functionality. Sings ABCs and others songs. Repeats a lot of things she hears. Answers simple questions. Tolerates the walker well for about an hour a day
Josie can army crawl with much effort. It takes her a while to get anywhere and the farthest she crawls in one effort is about 3 feet. Some days are markedly better than others.. She has the routine of army crawling to her shoes every morning.
Josie attends PT and OT at Oakland CCS on Tuesdays from 9 to 10. Josie has had intermittent great days at therapy where she army crawled over 15 feet or really got into rolling. However, there have been low days too. We seemed to have completely lost crawling on all fours since therapy started.
Josie can maintain the sitting up position with legs in front of her but bent a little (called ring-sitting) on the floor, although she hunches over and grabs her pant legs for support. She has to be encouraged and does not prefer this position.
We started swimming lessons twice a week on June 15.
· August 2009. We went to St. Louis Children's to meet with Dr. Connolly. She gave Josie a sedated muscle and nerve conduction test. Dr. Connoly's opinion is that Josie has a muscle problem, not a nerve problem. Several possibilities came from this appt, but none have panned out. Again, possibility of an auto immune problem was raised. Neither Connolly or Malhotra could explain difference in results between biopsy and her conduction test.
5 to 5.5 years (present)
· Josie has maintained most of the abilities in above summary but no longer tolerates her walker for longer than 10 minutes. She has lost most of her ability to use her legs in an upright position (and the walker no longer fits well.)
· Sleep continues to go well; she responds well to our bedtime routine and sleeps through the night (about 8p.m. to 6a.m.) most nights.
· January 2009 - Heel chord lengthening surgery. Successful!
· March 2009. Josie got her casts off from surgery - shortly after that she got another pressure sore on her right heel which took 2 months to heal.
· Seems to be growing cognitively, especially an improvement in speech. In many ways her cog. Development is about the same as a 2 or 3 year old though her fine motor is significantly less
· Socially, she is comparatively advanced. She loves people. She loves school, loves her teachers, and loves church.
· Although she has been drinking out of a cup for over a year, she still "forgets how." Often coughing and spluttering, especially when not in her highchair.
· She thrives on routine.
· Has always had a very short attention span but will now pay attention when short books are read to her and retells some of the books on her own.
· Continues to have good reflex responses in legs and feet.
That's it for Josie's first five and a half years. Still no diagnosis. We haven't made much progress on that front in the last year. But she's stayed pretty steady in her abilities for the last year. It has been a great respite from the times when her condition got progressively worse in awful bursts.
We don't expect much from tomorrow's meeting. But we are hopeful that this will be the beginning of a fruitful relationship.
Sunday, June 6, 2010
Maker Faire - What a blast!
The Maker Faire was awesome again. It is incredible to see all the amazing things that people come up with. There is so much to see. It is a bit overwhelming. Most of the time, we flit from booth to booth, like gnats with ADD.
Next year I think I need to accept the fact that I won't see the whole thing, and spend more time at the individual booths. One of the coolest things about the Maker Faire is that the guy who came up with the idea is right there, talking about his (or her) creations. They did a great job, I should thank them for that.
So to all you awesome makers out there, Thanks!
Now here are some pics:
And a Video:
One of the coolest things was running into old friends there. It is pretty awesome to see a familiar face in a crowd of 50,000. I hope to see you there again, next year.
Next year I think I need to accept the fact that I won't see the whole thing, and spend more time at the individual booths. One of the coolest things about the Maker Faire is that the guy who came up with the idea is right there, talking about his (or her) creations. They did a great job, I should thank them for that.
So to all you awesome makers out there, Thanks!
Now here are some pics:
And a Video:
One of the coolest things was running into old friends there. It is pretty awesome to see a familiar face in a crowd of 50,000. I hope to see you there again, next year.
Wednesday, March 31, 2010
Response to automobile-centric design
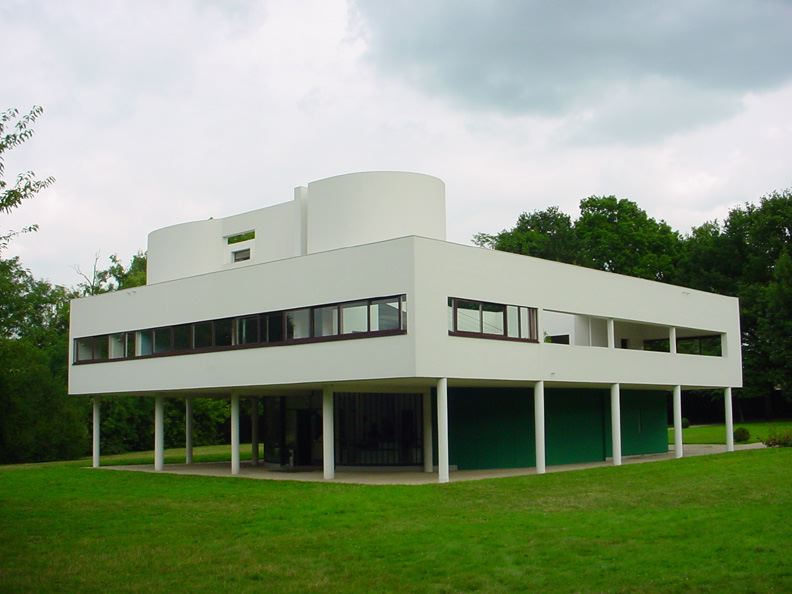
Corbusier's Villa Savoye is notable because it was designed exclusively for cars at a time when not everybody had one.

Things have changed since then. Today nearly EVERYTHING is designed for cars. We don't even notice how much of an impact they have on how we live. For instance, 1/4 of my home is devoted to the garage. 1/2 of the area of any retail establishment is required for parking. A significant fraction of a city is devoted exclusively to cars.

As a design exercise, I'd like to consider how the built environment would change if we put an equal effort into design for bicycles.
Where to begin? An internet search for bike storage. Here are some of the best results I found:
 http://www.re-nest.com/re-nest/shelving-storage/a-green-search-the-best-indoor-bicycle-rack-026165
 http://www.remodelista.com/posts/storage-inside-bicycle-storage-roundup
 http://www.flickr.com/photos/fastboy/287650174/
http://www.flickr.com/photos/toomanybicycles/258520950/in/set-72157594433824691/
Honestly I'm a bit disappointed in these. You can either hang your bike on the wall or hang it from the ceiling.
I want something more. I spend a significant amount of time and money on my bike. I think it's a thing of beauty. I'd like to store it in style. Perhaps put it on display when I'm not riding it. I think there's a lot of potential for innovation here. What if the bike replaced the fireplace as the focal point of a living room? A hook shaped wall hanger just doesn't cut it anymore.
Got any ideas for better designs? Tell me about them. I'll post my own ideas in future blogs.
Things have changed since then. Today nearly EVERYTHING is designed for cars. We don't even notice how much of an impact they have on how we live. For instance, 1/4 of my home is devoted to the garage. 1/2 of the area of any retail establishment is required for parking. A significant fraction of a city is devoted exclusively to cars.

As a design exercise, I'd like to consider how the built environment would change if we put an equal effort into design for bicycles.
Where to begin? An internet search for bike storage. Here are some of the best results I found:


http://www.flickr.com/photos/toomanybicycles/258520950/in/set-72157594433824691/
Honestly I'm a bit disappointed in these. You can either hang your bike on the wall or hang it from the ceiling.
I want something more. I spend a significant amount of time and money on my bike. I think it's a thing of beauty. I'd like to store it in style. Perhaps put it on display when I'm not riding it. I think there's a lot of potential for innovation here. What if the bike replaced the fireplace as the focal point of a living room? A hook shaped wall hanger just doesn't cut it anymore.
Got any ideas for better designs? Tell me about them. I'll post my own ideas in future blogs.
Thursday, March 11, 2010
Yikes!
1/2 folding bike, 1/2 electric bike, 1/2 sized penny farthing, fully awesome.
http://www.yikebike.com
My folding bike (a Giant Halfway), weighs in at nearly 30 pounds. This bike is 1/3 less weight, but 10 times the price.
Here's a round up of traditional folding bikes:
http://www.optimalride.com/folding-bicycles/best-folding-bikes.html
http://www.yikebike.com
My folding bike (a Giant Halfway), weighs in at nearly 30 pounds. This bike is 1/3 less weight, but 10 times the price.
Here's a round up of traditional folding bikes:
http://www.optimalride.com/folding-bicycles/best-folding-bikes.html
Monday, March 8, 2010
Managing CAD Standards with Excel
We started working with a single file. Then we moved to applying a script to multiple files with information pulled in from the operating system. Now we’ll discuss managing CAD standards information in Excel.
Any text information can be dropped into Excel, so an obvious place to pull info is the command line in AutoCAD itself. Layer information, styles, and dimensions can be collected from AutoCAD, and placed in Excel, where they are easily viewed and adjusted. Then, using the strategies shown earlier, that information can be returned to the CAD files, or applied to new files.
It is like working on a 1000 piece puzzle. It is easiest to pull out a bunch of similar pieces (all the edges or all the bright orange pieces) and work on them separately. Once you have that chunk put together you can return it to the main puzzle.
Layers from AutoCAD
Many commands allow you to list properties information: (-LAYER) layers, (DIMSTYLE) dimension styles, (LIST) properties, and (STATUS) status just to name a few. We’ll focus on the layers. Open a file that has your standard layers in it, and list the layers.
Here’s the command sequence -layer ? *
The text window should open.

Notice how the information comes out in a mostly tabulated form: just like a spreadsheet. You can copy the text from here and paste it into Excel.
At this point there are three main problems with the transferred information:
1. The information is in one single column.
2. The conversion from text to columns isn’t properly delimited.
3. There is some information that may cause data type errors in excel.
These are all fairly easy to deal with, but issues “B” and “C” may not be apparent till you’ve already dealt with issue “A.” An illustration may come in handy. Here’s what you could end up with if you just dive in.
 1. Excel assumes that the dash should be considered as a minus sign and turns it into a function
2. An extra space in front of “Layer” pushes it over by an extra column
3. The word “(white)” is redundant. The space before it pushes the column over to the right.
4. The error message for #1
5. Spaces within names of layers are read as indications of new columns
If you’ve come to this point, you could go through and clean up the information line by line and waste hours. But, in this case, an ounce of prevention is worth a pound of cure. You can do a little bit of work up front and save yourself a lot of heartache in the end.
First, be sure that none of your layer names contain spaces.
Second remove all the named colors. Find and replace will make this happen very quickly. As an example, you can trade (red) for blank.

Then do the same for, (white), (yellow), (cyan), (blue), (magenta) and (green).
Third, convert your column of text into a table. Select your column and choose “text to columns” from the data tab.

A wizard pops up that will take you through the steps. Here are screen shots of my preferences.


Now that’s a fine looking table! You can adjust it as you like. You may want to remove the blank rows and the “Press enter to continue” rows. You may want to add descriptions, colors, and titles. It is now a document that you can print out and give to all your AutoCAD users. You can make it as pretty as you like

But what happens if you’d like to add some additional layers? Or change some of the information in your file? It would be a shame to have to start with the CAD information, convert it and clean it every single time. The better thing to do is to turn this file into a script that will create all your layers automatically.
Excel Layers to AutoCAD
We have all the layer information. We simply need to figure out what inputs are required for the LAYER command, and then put our information into the proper locations. The script should look something like this:
LAYER
MAKE #1name COLOR #1color #1name LTYPE #1ltype #1name
MAKE #2name COLOR #2color #2name LTYPE #2ltype #2name
MAKE #3name COLOR #3color #3name LTYPE #3ltype #3name
…
SET
0
Where #name, #color, #ltype, and #p come from the columns we created earlier.
We want to keep our Layer Standards list as nice as possible for the CAD users, so the script should be generated on a different sheet. We’ll have to reference across sheets, but that isn’t too difficult.

Once you have a full row, concatenate your script, add spaces, then autofill.

Copy that column and paste it into a script. You’ll need to open with the LAYER command and close with a couple extra returns to conclude the LAYER command. And that’s it. I’ve placed a copy of the spreadsheet and the resulting script on Google docs here:
spreadsheet https://docs.google.com/templates?q=GeneralLayers_01&sort=hottest&view=author
And here:
script https://docs.google.com/templates?q=Layer_script&sort=hottest&view=public
Epilogue:
Through this series of blog posts, I’ve shown how Excel can be a powerful tool for developing AutoCAD scripts. There are of course other ways of accomplishing the same tasks. There are commercial tools specifically created to write scripts. AutoDesk has even created an “Action Recorder” to automate script creation. If you wanted something faster more powerful, you could use AutoLISP or VBA programming languages to accomplish the same things.
The beauty of this method is that it relies on software that is ubiquitous and very little additional specialized knowledge. These methods can be applied to other automation problems. It is a more general solution.
Best of all, this is a stepping stone to getting into some more advanced code writing. The first step into the world of programming is understanding that computers execute a series of instructions in order. Writing any program is simply creating a template for a series of actions.
Someday I may take it to the next step with AutoIT3, but for now I plan to get back to biking stuff.
Any text information can be dropped into Excel, so an obvious place to pull info is the command line in AutoCAD itself. Layer information, styles, and dimensions can be collected from AutoCAD, and placed in Excel, where they are easily viewed and adjusted. Then, using the strategies shown earlier, that information can be returned to the CAD files, or applied to new files.
It is like working on a 1000 piece puzzle. It is easiest to pull out a bunch of similar pieces (all the edges or all the bright orange pieces) and work on them separately. Once you have that chunk put together you can return it to the main puzzle.
Layers from AutoCAD
Many commands allow you to list properties information: (-LAYER) layers, (DIMSTYLE) dimension styles, (LIST) properties, and (STATUS) status just to name a few. We’ll focus on the layers. Open a file that has your standard layers in it, and list the layers.
Here’s the command sequence -layer ? *
The text window should open.

Notice how the information comes out in a mostly tabulated form: just like a spreadsheet. You can copy the text from here and paste it into Excel.
At this point there are three main problems with the transferred information:
1. The information is in one single column.
2. The conversion from text to columns isn’t properly delimited.
3. There is some information that may cause data type errors in excel.
These are all fairly easy to deal with, but issues “B” and “C” may not be apparent till you’ve already dealt with issue “A.” An illustration may come in handy. Here’s what you could end up with if you just dive in.

2. An extra space in front of “Layer” pushes it over by an extra column
3. The word “(white)” is redundant. The space before it pushes the column over to the right.
4. The error message for #1
5. Spaces within names of layers are read as indications of new columns
If you’ve come to this point, you could go through and clean up the information line by line and waste hours. But, in this case, an ounce of prevention is worth a pound of cure. You can do a little bit of work up front and save yourself a lot of heartache in the end.
First, be sure that none of your layer names contain spaces.
Second remove all the named colors. Find and replace will make this happen very quickly. As an example, you can trade (red) for blank.

Then do the same for, (white), (yellow), (cyan), (blue), (magenta) and (green).
Third, convert your column of text into a table. Select your column and choose “text to columns” from the data tab.

A wizard pops up that will take you through the steps. Here are screen shots of my preferences.


Now that’s a fine looking table! You can adjust it as you like. You may want to remove the blank rows and the “Press enter to continue” rows. You may want to add descriptions, colors, and titles. It is now a document that you can print out and give to all your AutoCAD users. You can make it as pretty as you like

But what happens if you’d like to add some additional layers? Or change some of the information in your file? It would be a shame to have to start with the CAD information, convert it and clean it every single time. The better thing to do is to turn this file into a script that will create all your layers automatically.
Excel Layers to AutoCAD
We have all the layer information. We simply need to figure out what inputs are required for the LAYER command, and then put our information into the proper locations. The script should look something like this:
LAYER
MAKE #1name COLOR #1color #1name LTYPE #1ltype #1name
MAKE #2name COLOR #2color #2name LTYPE #2ltype #2name
MAKE #3name COLOR #3color #3name LTYPE #3ltype #3name
…
SET
0
Where #name, #color, #ltype, and #p come from the columns we created earlier.
We want to keep our Layer Standards list as nice as possible for the CAD users, so the script should be generated on a different sheet. We’ll have to reference across sheets, but that isn’t too difficult.

Once you have a full row, concatenate your script, add spaces, then autofill.

Copy that column and paste it into a script. You’ll need to open with the LAYER command and close with a couple extra returns to conclude the LAYER command. And that’s it. I’ve placed a copy of the spreadsheet and the resulting script on Google docs here:
spreadsheet https://docs.google.com/templates?q=GeneralLayers_01&sort=hottest&view=author
And here:
script https://docs.google.com/templates?q=Layer_script&sort=hottest&view=public
Epilogue:
Through this series of blog posts, I’ve shown how Excel can be a powerful tool for developing AutoCAD scripts. There are of course other ways of accomplishing the same tasks. There are commercial tools specifically created to write scripts. AutoDesk has even created an “Action Recorder” to automate script creation. If you wanted something faster more powerful, you could use AutoLISP or VBA programming languages to accomplish the same things.
The beauty of this method is that it relies on software that is ubiquitous and very little additional specialized knowledge. These methods can be applied to other automation problems. It is a more general solution.
Best of all, this is a stepping stone to getting into some more advanced code writing. The first step into the world of programming is understanding that computers execute a series of instructions in order. Writing any program is simply creating a template for a series of actions.
Someday I may take it to the next step with AutoIT3, but for now I plan to get back to biking stuff.
Friday, February 19, 2010
I built my first bike!
In glorious 3D
Check it out!
Here's the link.
I've been wanting a decent road bike for a SketchUp project, and I couldn't find a match in the 3D Warehouse.
Check it out!
Here's the link.
I've been wanting a decent road bike for a SketchUp project, and I couldn't find a match in the 3D Warehouse.
Friday, January 29, 2010
Playing a Concert on a Kazoo: Collecting Files in DOS
Wouldn’t it be nice to apply a script of any complexity to a whole lot of files all at once? It’s possible if you’ve got a list of addresses for each of those files. How do you get a list of addresses? I use the DIR command in DOS.
You're going to need a bit of background in DOS if you don't have it already**. Here it goes...
If you are familiar with AutoCAD then you are familiar with the Command line. It is that constant flow of text across the bottom of the AutoCAD window. That piece of the interface is EXTREMELY old. All computer programs through the 60s, 70s and into the 80s ran from a command line. In fact Windows is called “Windows” because it broke away from the command line into a window based interface. Before then the Microsoft operating system was called DOS and was entirely text based (at least that’s what users worked with).
There are still vestiges of the old system hanging around. If you click on the start button and select Run… and type cmd you’ll get a command line window that allows you to access the operating system. You can navigate up and down through folders as you do in the Graphical User Interface (GUI). You can copy files, and do all the other things you’d do through the GUI, it just looks different.

There are things you can do with DOS, that you can’t do in Windows (at least not without a special utility). In particular, you can create a list of files from a directory. There’s a lot of other stuff you can do, but that gets deeper into DO than I’d like, so I’m going to leave that between you and the help files (HINT: Start Button: Help and Support). I’ll just give you an example of what I use to collect the addresses I need:
This command line instruction will scan through the given location and collect all the DWG file names (and paths) into a text file named drawing_list.txt. The text file output is placed in the current folder as indicated by the command line.

Now that we’ve got the list of files, we need to open them, run a series of commands, save and close the files. The basic template is this:
OPEN “C:\...Path…\dwg_name(1).dwg” COMMANDS QSAVE CLOSE
OPEN “C:\...Path…\dwg_name(2).dwg” COMMANDS QSAVE CLOSE
And so forth.
Note that we need quotation marks around the file path and name. (This is because we may have spaces that would normally cause AutoCAD to start a new command).
Create this as a template in Excel.


AutoFILL throughout the rest of the spreadsheet.

Copy this to Notepad and run it as a script in AutoCAD.
Once again, here’s a spreadsheet as a Google Doc. Unfortunately, the paths and names are unique to my computer, so you'll have to go to some extra effort to get all the pieces to come together properly.
In this section, we’ve covered two main points:
1. How to collect file information from the DOS prompt.
2. How to deal with spaces in file paths and names. (Use quotes.)
In the next post well pull information from AutoCAD. We’ll run into more situations where syntax between Excel and AutoCAD doesn’t translate directly. And we'll figure out how to correct those problems.
** I used to take the command line for granted. Then I found this essay by Neil Stephenson: In the Beginning was the Command Line It is beautifully written and well worth the effort to download.
You're going to need a bit of background in DOS if you don't have it already**. Here it goes...
If you are familiar with AutoCAD then you are familiar with the Command line. It is that constant flow of text across the bottom of the AutoCAD window. That piece of the interface is EXTREMELY old. All computer programs through the 60s, 70s and into the 80s ran from a command line. In fact Windows is called “Windows” because it broke away from the command line into a window based interface. Before then the Microsoft operating system was called DOS and was entirely text based (at least that’s what users worked with).
There are still vestiges of the old system hanging around. If you click on the start button and select Run… and type cmd you’ll get a command line window that allows you to access the operating system. You can navigate up and down through folders as you do in the Graphical User Interface (GUI). You can copy files, and do all the other things you’d do through the GUI, it just looks different.

There are things you can do with DOS, that you can’t do in Windows (at least not without a special utility). In particular, you can create a list of files from a directory. There’s a lot of other stuff you can do, but that gets deeper into DO than I’d like, so I’m going to leave that between you and the help files (HINT: Start Button: Help and Support). I’ll just give you an example of what I use to collect the addresses I need:
dir "C:\Documents and Settings\mritzman\My Documents\ACAD_Excel\*.dwg" /s /b > drawing_list.txt
This command line instruction will scan through the given location and collect all the DWG file names (and paths) into a text file named drawing_list.txt. The text file output is placed in the current folder as indicated by the command line.

Now that we’ve got the list of files, we need to open them, run a series of commands, save and close the files. The basic template is this:
OPEN “C:\...Path…\dwg_name(1).dwg” COMMANDS QSAVE CLOSE
OPEN “C:\...Path…\dwg_name(2).dwg” COMMANDS QSAVE CLOSE
And so forth.
Note that we need quotation marks around the file path and name. (This is because we may have spaces that would normally cause AutoCAD to start a new command).
Create this as a template in Excel.

- For our purposes, we’ll reuse the function we started with: add a square to the origin of each of each file.
- Fill in the columns from our sources.
- Add in the concatenate command.
- Make sure quotations and spaces are in the right places.
- Add a space and quotes at the end of the OPEN command
- Add quotes and a space at the beginning of the command series (REC and so forth)
- Add a space after the QSAVE command
- Add an =CONCATENATE() series to tie everything together.

AutoFILL throughout the rest of the spreadsheet.

Copy this to Notepad and run it as a script in AutoCAD.
Once again, here’s a spreadsheet as a Google Doc. Unfortunately, the paths and names are unique to my computer, so you'll have to go to some extra effort to get all the pieces to come together properly.
In this section, we’ve covered two main points:
1. How to collect file information from the DOS prompt.
2. How to deal with spaces in file paths and names. (Use quotes.)
In the next post well pull information from AutoCAD. We’ll run into more situations where syntax between Excel and AutoCAD doesn’t translate directly. And we'll figure out how to correct those problems.
** I used to take the command line for granted. Then I found this essay by Neil Stephenson: In the Beginning was the Command Line It is beautifully written and well worth the effort to download.
Thursday, January 21, 2010
What Comes Next: The Series
So far, we’ve done the same work in Excel that we would have done in Notepad++. There hasn’t been any improvement in our process. So what good is it? Why is Excel better?
There are at least three reasons why you’d want to use Excel:
1. Functions: Math, Logic, Reference, Text, Statistics, and more.
2. Spiffy interface tools like AutoFill and Sort
3. The ability to recombine your raw data.
Excel is extremely good at generating, parsing, examining, adjusting, and recompiling data. If you’d like to do any of those things in an AutoCAD script, Excel can help you get there.
Let’s take an example:
Make an array of 100 squares where every square is 1 unit greater than the previous. Also, just to make it interesting, each rectangle is created at the ending point of the previous rectangle.
This is a simple task, entering it by hand, but you might die of boredom. A standard rectangular or polar array is simple in AutoCAD, there’s a tool for that. But this isn't a simple array. It is perfect for Excel, though.
Start by creating a table of values. We want the X and Y coordinates for the origins of the squares and the lengths of each side.

The initial point is at 0,0 and the initial lengths are both 1.
First, let’s take the squares. Each one increases by 1. This is a linear series. If we fill in the second row AutoFill will recognize the pattern quickly.

Do a basic Autofill: Select the cells with the initial numbers of your series. Click on the black square in the lower right corner. Drag downward and the values will automatically populate. More information is available in the Excel help files.
Second and a bit more difficult: the starting points for each square. Each new square begins where the old square ends. And the next square starts where the last square finished. This can be figured in a couple of ways
1. Xn equals the previous origin (Xn-1) plus the previous square length(Ln-1): Xn=Xn-1+Ln-1
2. Or Xn equals the sum of all the previous square lengths: Xn=Sum of Ln-1
I prefer the first way, and it is easier to get Excel to follow it. In order to get Excel to add the values in other cells you have to indicate the references, by calling out the cell names.
Here are our first three rows:

Note the formula for the current cell A4=A3+C3. The next cell down will be A5=A4+C4, and so forth.
Now you can AutoFill the origins for the x and y values. Your spreadsheet will now look something like this:

You’ve solved most of the problem. Here are all the values that change over time. Now you need to glue them together into something meaningful for AutoCAD to understand.
Putting it all together
Now we’ve got all the data points we need we need glue them together with the commands that AutocAD understands. To do this we’ll use the =CONCATENATE() function. This function will take strings (or snippets of text) and combine them into a single string. These snippets can come from cells or from within the arguments of the CONCATENATE command
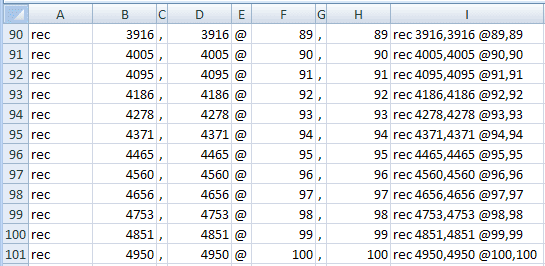
We’ll add the rectangle command, commas for point locations, and the @ symbol for relative coordinates. Finally we’ll add the spaces between quotes within the parenthesis.
Here’s how our first row looks.

Note the concatenate formula and how the result looks like something you might enter in AutoCAD.
Now Autofill the rest of the cells.
Copy the concatenated cells and paste them into the command line of AutoCAD (or create a script from them).
Your result should look like this. If it doesn’t, read the command line to find out what went wrong. I almost never get it exactly right on my first try.

I’ve created this script as a Google Doc Template that you can access. You can find it here:
https://docs.google.com/templates?q=rectangle_series&sort=hottest&view=public
This method can be applied to a wide range of problems. All you need are the following four things:
1. A problem that needs to be addressed multiple times (script worthiness)
2. A data source that can be viewed in a table (a list of some sort)
3. A pattern for adjusting that data (some sense of how things need to change)
4. An output that can be entered at a command line (usually created with the =CONCATENATE() function).
The next question is where should you pull your data from? I’ll leave that for my next post.
There are at least three reasons why you’d want to use Excel:
1. Functions: Math, Logic, Reference, Text, Statistics, and more.
2. Spiffy interface tools like AutoFill and Sort
3. The ability to recombine your raw data.
Excel is extremely good at generating, parsing, examining, adjusting, and recompiling data. If you’d like to do any of those things in an AutoCAD script, Excel can help you get there.
Let’s take an example:
Make an array of 100 squares where every square is 1 unit greater than the previous. Also, just to make it interesting, each rectangle is created at the ending point of the previous rectangle.
This is a simple task, entering it by hand, but you might die of boredom. A standard rectangular or polar array is simple in AutoCAD, there’s a tool for that. But this isn't a simple array. It is perfect for Excel, though.
Start by creating a table of values. We want the X and Y coordinates for the origins of the squares and the lengths of each side.

First, let’s take the squares. Each one increases by 1. This is a linear series. If we fill in the second row AutoFill will recognize the pattern quickly.

Do a basic Autofill: Select the cells with the initial numbers of your series. Click on the black square in the lower right corner. Drag downward and the values will automatically populate. More information is available in the Excel help files.
Second and a bit more difficult: the starting points for each square. Each new square begins where the old square ends. And the next square starts where the last square finished. This can be figured in a couple of ways
1. Xn equals the previous origin (Xn-1) plus the previous square length(Ln-1): Xn=Xn-1+Ln-1
2. Or Xn equals the sum of all the previous square lengths: Xn=Sum of Ln-1
I prefer the first way, and it is easier to get Excel to follow it. In order to get Excel to add the values in other cells you have to indicate the references, by calling out the cell names.
Here are our first three rows:

Now you can AutoFill the origins for the x and y values. Your spreadsheet will now look something like this:

You’ve solved most of the problem. Here are all the values that change over time. Now you need to glue them together into something meaningful for AutoCAD to understand.
Putting it all together
Now we’ve got all the data points we need we need glue them together with the commands that AutocAD understands. To do this we’ll use the =CONCATENATE() function. This function will take strings (or snippets of text) and combine them into a single string. These snippets can come from cells or from within the arguments of the CONCATENATE command
We’ll add the rectangle command, commas for point locations, and the @ symbol for relative coordinates. Finally we’ll add the spaces between quotes within the parenthesis.
Here’s how our first row looks.

Note the concatenate formula and how the result looks like something you might enter in AutoCAD.
Now Autofill the rest of the cells.

Copy the concatenated cells and paste them into the command line of AutoCAD (or create a script from them).
Your result should look like this. If it doesn’t, read the command line to find out what went wrong. I almost never get it exactly right on my first try.

I’ve created this script as a Google Doc Template that you can access. You can find it here:
https://docs.google.com/templates?q=rectangle_series&sort=hottest&view=public
This method can be applied to a wide range of problems. All you need are the following four things:
1. A problem that needs to be addressed multiple times (script worthiness)
2. A data source that can be viewed in a table (a list of some sort)
3. A pattern for adjusting that data (some sense of how things need to change)
4. An output that can be entered at a command line (usually created with the =CONCATENATE() function).
The next question is where should you pull your data from? I’ll leave that for my next post.
Monday, January 18, 2010
First things first – Creating a basic script
As I mentioned previously, a script is simply a list of commands executed sequentially. All you have to do in Excel is create a list of commands. Then you can paste these commands into the command line of AutoCAD and they will execute.
Here’s an example of a script that creates a simple rectangle:
Rec
0,0
1,1
To test it out, you can copy the text and paste it into the command line.
A quick reminder here, you need to be aware of how many spaces and returns are included when you run scripts. Too few and your last command won't be concluded (just hit enter in ACAD) too many and you'll start another command (just hit ESC).
Pretty simple, no?
A quick reminder here, you need to be aware of how many spaces and returns are included when you run scripts. Too few and your last command won't be concluded (just hit enter in ACAD) too many and you'll start another command (just hit ESC).
Pretty simple, no?
Here is the same rectangle in a table
Rec |
0,0 |
2,2 |
Test this one as well. Copy and paste into the command line.

That’s the basic idea.
Now, it might not look like much, but now that you are working in Excel, you can use all the tools that come along with Excel. You can use functions and references to move your data around or change it however you like.
Friday, January 15, 2010
The BEST scripting tool for AutoCAD
WARNING: the following posts may contain graphic representations of actual mathematics. Also if you don't use (or care to use) AutoCAD, Excel, or Notepad++ you may want to skip the next few posts. Don't worry; I'll return to the topic of cycling very soon.
Scripts are a great way to automate many processes in AutoCAD. They are simple. If you use the command line you can use a script. They are easy to create, just open a text editor like notepad++. They are easy to run. You can open them like any other document, or you can incorporate them into the CUI or tool palettes.
Scripts are a great way to automate many processes in AutoCAD. They are simple. If you use the command line you can use a script. They are easy to create, just open a text editor like notepad++. They are easy to run. You can open them like any other document, or you can incorporate them into the CUI or tool palettes.
Of course, you must be very careful, you have to dot all your “i”s and cross all your “t”s. You must have the exact number of spaces located in the right places. Because of the time it takes you’ll want to re-use your script as many times as possible. But there isn’t much flexibility. Once you’re done with the main script you may want to change it slightly, or apply it to a bunch of files. Is it possible to automate the process of creating automations?
There are a variety of tools out there specifically designed for applying scripts to multiple files and editing scripts. But the handiest tool I’ve found is almost ubiquitous. It is simply a spreadsheet program. Excel, Open Office, even Google Docs can be used to make the task of scripting easier.
Over the course of the next few posts, I’ll show you some of my processes for using Excel to write scripts. I’ll conclude with excel scripts designed to help with layer management.
But first, I have to give props to Mark Johnson of the SF AutoCAD Users group for turning me on to this one. I’d just gotten into creating scripts in a text editor when he led a discussion on using Excel. It was an eye opening experience. One script he showed us generated structural shapes based on calculations derived in excel. Another took image data from a couple of photographs and mapped points in 3D.
I’ve never done anything as intense as he showed, but I’ve heavily integrated the tools into my daily work.
Thursday, December 24, 2009
Why bike? Reason #1
The scenery.
I was out for an just an hour and saw sights much like these (photos from Panoramio, but could have been taken today):


I was out for an just an hour and saw sights much like these (photos from Panoramio, but could have been taken today):


Wednesday, December 9, 2009
Space Value Judgments
I've been thinking a lot more about space as an indicator of value. As a general rule, the more space you give to something, the more you value it.
My current company, Robert Stephen Consulting, assesses the amount of space a company devotes to its various activities compares that with the total space available, so our clients cam come to conclusions about whether the space is used effectively.
Space is a type of capital, like currency or labor. It can be managed much like money and time can be, though not nearly as liquid. It has been a change of perspective for to look at it as a commodity.
At work, we consider cubicles, office spaces, and circulation space. But I've begun to look at my closet space, desk space, garage space, and storage space in a similar way. Am I using my space effectively? Do my space allocations match the value I attach to the objects and activities in my life?
My current company, Robert Stephen Consulting, assesses the amount of space a company devotes to its various activities compares that with the total space available, so our clients cam come to conclusions about whether the space is used effectively.
Space is a type of capital, like currency or labor. It can be managed much like money and time can be, though not nearly as liquid. It has been a change of perspective for to look at it as a commodity.
At work, we consider cubicles, office spaces, and circulation space. But I've begun to look at my closet space, desk space, garage space, and storage space in a similar way. Am I using my space effectively? Do my space allocations match the value I attach to the objects and activities in my life?
Tuesday, December 1, 2009
SF Bike Expo - Highlights
Honestly, the San Francisco Bike Expo http://sfbikeexpo.com/ was disappointing. It felt like a flea market rather than a convention. I would have liked to see new developments, serious custom bikes, and more of the stuff on the fringe. The Maker Faire is much better event for unique bike stuff.
There were a few displays that really caught my eye.
Wooden Bikes - a new take on an old material.
There were a few displays that really caught my eye.
Wooden Bikes - a new take on an old material.
- Renovo http://www.renovobikes.com/ - engineered hardwood bicycles that you can park in your living room.
- Bamboo bikes - there were a couple companies showing off their bamboo bikes.
- Shelia Moon -http://store.sheilamoon.com/
- Outlier - http://outlier.cc/
- They retrofit bikes with Bicycle Torque Couplers (BTCs) which allow any bike to be disassembled.
- They build special custom tandem bikes where one rider is upright and the other is recumbent. This Viewpoint model can be adapted for special needs riders. We've ordered one and should get it around the middle of February. I'll post pictures when they are available.
Sunday, November 1, 2009
Josie Ben Hur
I've always liked Halloween. My dad, an engineer, created elaborate costumes. One year he taught my brother how to walk on stilts so he could be Frankenstein's monster, he constructed a neck and shoulders to sit on top of mine, so I could be the headless horseman, and worked with my mom on a witch's dress and hat for my sister.

This isn't the kind of fun you can buy at a costume store.
It has long been my desire to put together something with a bit of flair. Finally, nearly 30 years later, I came through.
My daughter, Josie, has a lot of medical equipment to help her get around. One of the cooler things is her stander. It gives her practice with balance, and gives her muscles a work out.

We've often thought that it looks a bit like a chariot, so the choice for for a costume was rather obvious. I got some inspiration online.

I then built a 3D model in SketchUp.

At first I was going to build the whole stander. I changed my mind when I realized how complex it would be. Really, I only needed a few dimensions and clearances. The rest didn't really matter for my purposes.
It took a little extra work to give all the pieces thickness, but in the end it paid off because I was able to get exact dimensions for everything.

The virtual model was pretty quick. The physical model took much longer. I had to cut everything out by hand.

Glue the pieces together.

Then check the fit.


Finally I painted it.

The helmet took an inordinately long time to put together. This was the third iteration. Historical accuracy and time constraints encouraged simplicity.
The hobby horse was a last minute addition. Perhaps it could have been integrated a bit better, but I think it added a nice touch.
This isn't the kind of fun you can buy at a costume store.
It has long been my desire to put together something with a bit of flair. Finally, nearly 30 years later, I came through.
My daughter, Josie, has a lot of medical equipment to help her get around. One of the cooler things is her stander. It gives her practice with balance, and gives her muscles a work out.
We've often thought that it looks a bit like a chariot, so the choice for for a costume was rather obvious. I got some inspiration online.
I then built a 3D model in SketchUp.
At first I was going to build the whole stander. I changed my mind when I realized how complex it would be. Really, I only needed a few dimensions and clearances. The rest didn't really matter for my purposes.
It took a little extra work to give all the pieces thickness, but in the end it paid off because I was able to get exact dimensions for everything.
The virtual model was pretty quick. The physical model took much longer. I had to cut everything out by hand.
Glue the pieces together.
Then check the fit.
Finally I painted it.
The helmet took an inordinately long time to put together. This was the third iteration. Historical accuracy and time constraints encouraged simplicity.
The hobby horse was a last minute addition. Perhaps it could have been integrated a bit better, but I think it added a nice touch.
Subscribe to:
Posts (Atom)