Friday, January 29, 2010

Playing a Concert on a Kazoo: Collecting Files in DOS

Wouldn’t it be nice to apply a script of any complexity to a whole lot of files all at once?  It’s possible if you’ve got a list of addresses for each of those files.  How do you get a list of addresses?  I use the DIR command in DOS.

You're going to need a bit of background in DOS if you don't have it already**.  Here it goes...

If you are familiar with AutoCAD then you are familiar with the Command line.  It is that constant flow of text across the bottom of the AutoCAD window.  That piece of the interface is EXTREMELY old.  All computer programs through the 60s, 70s and into the 80s ran from a command line.  In fact Windows is called “Windows” because it broke away from the command line into a window based interface.  Before then the Microsoft operating system was called DOS and was entirely text based (at least that’s what users worked with).

There are still vestiges of the old system hanging around.  If you click on the start button and select Run… and type cmd you’ll get a command line window that allows you to access the operating system.  You can navigate up and down through folders as you do in the Graphical User Interface (GUI).   You can copy files, and do all the other things you’d do through the GUI, it just looks different.


There are things you can do with DOS, that you can’t do in Windows (at least not without a special utility).  In particular, you can create a list of files from a directory.  There’s a lot of other stuff you can do, but that gets deeper into DO than I’d like, so I’m going to leave that between you and the help files (HINT: Start Button: Help and Support).  I’ll just give you an example of what I use to collect the addresses I need:

dir "C:\Documents and Settings\mritzman\My Documents\ACAD_Excel\*.dwg" /s /b > drawing_list.txt

This command line instruction will scan through the given location and collect all the DWG file names (and paths) into a text file named drawing_list.txt.  The text file output is placed in the current folder as indicated by the command line.


Now that we’ve got the list of files, we need to open them, run a series of commands, save and close the files.  The basic template is this:

OPEN “C:\...Path…\dwg_name(1).dwg” COMMANDS QSAVE CLOSE
OPEN “C:\...Path…\dwg_name(2).dwg” COMMANDS QSAVE CLOSE
And so forth. 

Note that we need quotation marks around the file path and name.  (This is because we may have spaces that would normally cause AutoCAD to start a new command). 

Create this as a template in Excel.


  • For our purposes, we’ll reuse the function we started with:  add a square to the origin of each of each file.
  • Fill in the columns from our sources.  
  • Add in the concatenate command.  
  • Make sure quotations and spaces are in the right places.   
    • Add a space and quotes at the end of the OPEN command 
    • Add quotes and a space at the beginning of the command series (REC and so forth)
    • Add a space after the QSAVE command
  • Add an =CONCATENATE() series to tie everything together.
It should look something like this:


AutoFILL throughout the rest of the spreadsheet.

Copy this to Notepad and run it as a script in AutoCAD.

Once again, here’s a spreadsheet as a Google Doc.  Unfortunately, the paths and names are unique to my computer, so you'll have to go to some extra effort to get all the pieces to come together properly.

In this section, we’ve covered two main points:
1.    How to collect file information from the DOS prompt.
2.    How to deal with spaces in file paths and names. (Use quotes.)

In the next post well pull information from AutoCAD.  We’ll run into more situations where syntax between Excel and AutoCAD doesn’t translate directly.  And we'll figure out how to correct those problems.

** I used to take the command line for granted.  Then I found this essay by Neil Stephenson: In the Beginning was the Command Line It is beautifully written and well worth the effort to download.

Thursday, January 21, 2010

What Comes Next: The Series

So far, we’ve done the same work in Excel that we would have done in Notepad++.  There hasn’t been any improvement in our process.  So what good is it?  Why is Excel better?

There are at least three reasons why you’d want to use Excel:
1.    Functions: Math, Logic, Reference, Text, Statistics, and more.
2.    Spiffy interface tools like AutoFill and Sort
3.    The ability to recombine your raw data.

Excel is extremely good at generating, parsing, examining, adjusting, and recompiling data.  If you’d like to do any of those things in an AutoCAD script, Excel can help you get there.

Let’s take an example:

Make an array of 100 squares where every square is 1 unit greater than the previous.  Also, just to make it interesting, each rectangle is created at the ending point of the previous rectangle.

This is a simple task, entering it by hand, but you might die of boredom.  A standard rectangular or polar array is simple in AutoCAD, there’s a tool for that.  But this isn't a simple array.  It is perfect for Excel, though.

Start by creating a table of values.  We want the X and Y coordinates for the origins of the squares and the lengths of each side.

The initial point is at 0,0 and the initial lengths are both 1.

First, let’s take the squares.  Each one increases by 1.  This is a linear series.  If we fill in the second row AutoFill will recognize the pattern quickly.


Do a basic Autofill: Select the cells with the initial numbers of your series.  Click on the black square in the lower right corner.  Drag downward and the values will automatically populate.  More information is available in the Excel help files.

Second and a bit more difficult: the starting points for each square.  Each new square begins where the old square ends.  And the next square starts where the last square finished.   This can be figured in a couple of ways

1.    Xn equals the previous origin (Xn-1) plus the previous square length(Ln-1): Xn=Xn-1+Ln-1
2.    Or Xn equals the sum of all the previous square lengths: Xn=Sum of Ln-1

I prefer the first way, and it is easier to get Excel to follow it.  In order to get Excel to add the values in other cells you have to indicate the references, by calling out the cell names.

Here are our first three rows:

Note the formula for the current cell A4=A3+C3.  The next cell down will be A5=A4+C4, and so forth.

Now you can AutoFill the origins for the x and y values.  Your spreadsheet will now look something like this:


You’ve solved most of the problem.  Here are all the values that change over time.  Now you need to glue them together into something meaningful for AutoCAD to understand.

Putting it all together

Now we’ve got all the data points we need we need glue them together with the commands that AutocAD understands.  To do this we’ll use the =CONCATENATE() function.  This function will take strings (or snippets of text) and combine them into a single string.  These snippets can come from cells or from within the arguments of the CONCATENATE command

We’ll add the rectangle command, commas for point locations, and the @ symbol for relative coordinates.  Finally we’ll add the spaces between quotes within the parenthesis.

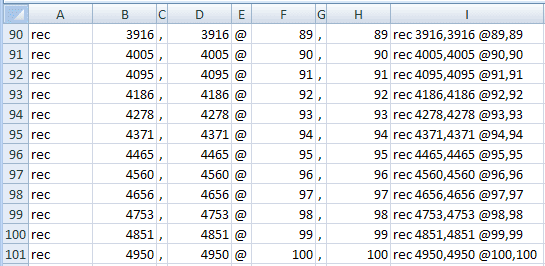
Here’s how our first row looks.


Note the concatenate formula and how the result looks like something you might enter in AutoCAD.

Now Autofill the rest of the cells.


Copy the concatenated cells and paste them into the command line of AutoCAD (or create a script from them).

Your result should look like this.  If it doesn’t, read the command line to find out what went wrong.  I almost never get it exactly right on my first try.


I’ve created this script as a Google Doc Template that you can access.  You can find it here:
https://docs.google.com/templates?q=rectangle_series&sort=hottest&view=public

This method can be applied to a wide range of problems.  All you need are the following four things:
1.    A problem that needs to be addressed multiple times (script worthiness)
2.    A data source that can be viewed in a table (a list of some sort)
3.    A pattern for adjusting that data (some sense of how things need to change)
4.    An output that can be entered at a command line (usually created with the =CONCATENATE() function).

The next question is where should you pull your data from?  I’ll leave that for my next post.

Monday, January 18, 2010

First things first – Creating a basic script

As I mentioned previously, a script is simply a list of commands executed sequentially.  All you have to do in Excel is create a list of commands.  Then you can paste these commands into the command line of AutoCAD and they will execute.

Here’s an example of a script that creates a simple rectangle:
Rec
0,0
1,1

To test it out, you can copy the text and paste it into the command line.

A quick reminder here, you need to be aware of how many spaces and returns are included when you run scripts.  Too few and your last command won't be concluded (just hit enter in ACAD) too many and you'll start another command (just hit ESC).

Pretty simple, no?

Here is the same rectangle in a table
Rec
0,0
2,2


Test this one as well.   Copy and paste into the command line.


That’s the basic idea. 

Now, it might not look like much, but now that you are working in Excel, you can use all the tools that come along with Excel.  You can use functions and references to move your data around or change it however you like.

Friday, January 15, 2010

The BEST scripting tool for AutoCAD

WARNING: the following posts may contain graphic representations of actual mathematics.  Also if you don't use (or care to use) AutoCAD, Excel, or Notepad++ you may want to skip the next few posts.  Don't worry; I'll return to the topic of cycling very soon.

Scripts are a great way to automate many processes in AutoCAD.  They are simple.  If you use the command line you can use a script.  They are easy to create, just open a text editor like notepad++.  They are easy to run.  You can open them like any other document, or you can incorporate them into the CUI or tool palettes.

Of course, you must be very careful, you have to dot all your “i”s and cross all your “t”s.  You must have the exact number of spaces located in the right places.  Because of the time it takes you’ll want to re-use your script as many times as possible.  But there isn’t much flexibility.  Once you’re done with the main script you may want to change it slightly, or apply it to a bunch of files.  Is it possible to automate the process of creating automations?

There are a variety of tools out there specifically designed for applying scripts to multiple files and editing scripts.  But the handiest tool I’ve found is almost ubiquitous.  It is simply a spreadsheet program.  Excel, Open Office, even Google Docs can be used to make the task of scripting easier.
Over the course of the next few posts, I’ll show you some of my processes for using Excel to write scripts.  I’ll conclude with excel scripts designed to help with layer management.

But first, I have to give props to Mark Johnson of the SF AutoCAD Users group for turning me on to this one.  I’d just gotten into creating scripts in a text editor when he led a discussion on using Excel. It was an eye opening experience.  One script he showed us generated structural shapes based on calculations derived in excel.  Another took image data from a couple of photographs and mapped points in 3D.

I’ve never done anything as intense as he showed, but I’ve heavily integrated the tools into my daily work.